Tuesday, March 1, 2011

Vertical Fabric Painting

      Someone recently wrote to me asking me what I use for my design wall. I wrote that I have two- one on each side of my studio.
I used several 4'x8' sheets of light weight insulation boards that I brought from a local hardware mart.
 It's about 1/2" or so in depth. Easy to transport or even cut with a utility knife.
     One is covered in wide flannel, that I think I bought from Hancock Fabrics.
     The other one is painted white. I use this to pin into/ hang work, and as another gallery wall during Open Studio events.
     But I also enjoy painting vertically- like painters do using easels. When I do this, I cover the painted wall with 4 ml painters plastic. Tape my fabric and paint away. This is just the ticket when I don't want to lean over my work at a table.
( Can you guess why I don't pin it?)
     Another trick I find handy, is to cover 20x30 foam boards in plastic or better yet,  kitchen bags. 
Lay on my fabric and paint on those. Then, I can take them to a drying rack or floor area to dry. 

This is really handy when I do sun printing in fair weather. I can paint, take the fabric supported on the covered foam board and simply slide it off outside. Add my items to sunpaint and run back inside (or on nearby picnic table in the shade) and paint some more!!

Painted and Sunprinted Fabric Sample
I reuse my foam board with another plastic bag. I save the bags to use over and over!

Saturday, February 19, 2011

a Commission, the Finish

After the main sections of the piece are stretched and stapled, I'm ready to do up the corners. This is done similar to the way of wrapping a present, all the while you're tugging to place pressure on the cloth for a smooth tight corner. This is a little difficult with a thicker fabric like cotton duck.

After the backing is completed and trimmed to fit within 1/4" on the strecher bars. I glue it to the back. If I've done this correctly the transfer will fit exactly under the silk organza photo to create the 3-D effect I call Holographic Images. I always dry with the image up to prevent any mediums or glue from creating blobs on the front.
I weight it down with heavy objects, beach stones and old irons, to make sure backing is in contact with the piece as it dries. Make sure the objects can't roll into your piece and make a pressure stretch marks and ruin it.
When it's dry. I add a label, hanger and wire and it's ready for it's new home!


Clear Light
Commission from Art 3 for the Elliot at Rivers Edge which is part of the Elliot Hospital in Manchester, NH
Holographic Images- Multi-level Surface Design/Mixed Media.
Original image taken at Deer Isle, ME, printed on archival digital canvas. Sewn borders in hand painted and surface designed cotton duck, additional stitching line details, silkscreen and mediums.
A section of the image was constructed with transparent silk organza, providing a holographic effect.   30x40
Clear Light 1st finish


Clear Light full side-view


Scraps left over are used in my collage work!

"amazing-- ripples of water can look so calming and so serene- sunlit and inspiring work."
Thank you! Donna Watson
her blog here

Wednesday, February 16, 2011

a Commission Phase III

Today I decided to highlite the glass bead and pumice gel accents that had thoughly dried with silver oil stick. I like this technique and use it often. It's hard to resist adding a little color but I think it makes the added textured medium stand out like sparkling water. 

  
     I silkscreened a few waves from a thermal fax silkscreen I made from a detail of the original photo. Just a few squeegees to carry the wave action softly into the borders. I used a mix of antique gold and metallic paint from Pro Chem. The colors mixed here and there into a great olive. Just the touch of green I needed!
     I decided the right side of the bordered piece needed more accent. I had painted some scrim earlier with the dregs of the paint brush- I always 'clean' my brush on a scrap cloth, hand-wipe or something rather than washing all of that wonderful paint into the drain. So I had some already to use. I cut into it and moved it around and applied with gel medium. I added the bits I cut out too and an overlay of more textured medium, to which I applied more silver oil stick. 

      Perfect. Now to let this all dry before I can mount it. I work on the backing that I painted the other day. I use HTC brand poly/rayon medium weight stabilizer for my Holographic Images backing material. It can take the abuse of ink jet transfer, paint and stretching and most importantly, will not tear as easily as a paper backing will. Unfortunately, I need to piece it as it doesn't come wide enough.
After, I carefully position the inkjet transfer (printed in mirror image) on the backing to line up with the transparent organza section. I iron it on and peel. I really like the way the painted backing allows the transfer to blend in.
All set to mount.
I use 3/4" Dick Blick's or Fredrix artist stretcher bars for mounting. These bars are a good quality and I've used them for a number of years.
Reference- https://www.dickblick.com/products/blick-standard-stretcher-bars/
or
https://www.dickblick.com/products/fredrix-standard-stretcher-bars/
After I assemble the bars, tap corners dull, I'm ready to mount. I stretch the piece by centering and stapling with a staple gun and J21 size staples.
Starting to staple on opposite sides, I check often to see if I need to change the position- which I do a couple times. I use a standard staple remover to remove staples in order to do this.


My son gave me this gismo for the Holidays. I think they used to use it to moisten stamps. I get my fingers wet which gives me a better grip on the cloth when stretching it.

 Finishing up the corners and I'm ready to back it and glue it down.

Monday, February 14, 2011

a Commission Phase II

The first thing I did when I woke this morning, before coffee! I went over the painted fabric with some pewter, silver, light green and off white- to tone it down, add more depth and texture.
Hmm- we'll have to wait till this dries to see if the color is what I want.

I should share the previous work that inspired Joni to choose me for this commission. It is called Essence.
Essence


        The fabric is dry and I'm ready to cut into it- almost hate to do it! I even like the back!

The fiber photo is sewn and ready for border. I want the placement of borders to echo the color placement in the photo. 


I use an old iron to steady the clear ruler for long cuts. I’ve had too many wonky borders. It’s like a third hand holding the ruler at one end while I cut. Sometimes I use two or even heavy beach rocks.


I trim all the threads on the back and seal the seams with medium. This ensures no loose threads will show though the silk organza ‘window’ and secures the seams. 


I choose the mediums I will apply to the front/face of piece, which I decided to call “Clear Light”. 
I use a satin varnish to seal/UV protect the painted fabric borders and gloss medium for photo. The gloss medium adds a little punch, shine and deepens the colors on the ink jet fabric photo. Do not do this in direct sunlight! There is some kind of reaction and it turns white! Make sure you shake any product you use thoroughly and if you haven't used it in a while test it. 

I also add a small bit of pumice gel to accent shadows, some pearl-x mixed with medium to highlight shine on the water and glass bead medium to really bring this home. When you add the medium it is milky white but will dry clear.
This is a bit like an act of courage because once it's dry, it's on!


Saturday, February 12, 2011

a Commission

I was contacted by a friend, Joni, in a gallery I have been with for years, Art 3, Manchester, NH.  here They took me on as a newbie when I first starting pushing my artwork out of my studio.
Last week she phoned me with a commission for the Elliot at Rivers Edge which is part of the Elliot Hospital in Manchester, NH. Great! But it needs to be done before March. OK I can do this!
After looking at some of my previous art, she decided that the piece is to be a combination of digital fiber, holographic imagery and painted/silkscreened fabric with a water theme.
I sent a variety of pix to her to choose from, my artists price and got the approval to go forward.
original image

image simulation 
Next, I worked on the photo to enhance the colors, change the hue to meet a slightly different color scheme and divided the photo into parts that will be sewn together. I needed to figure out the size of each piece and the painted borders to fit her size requirement of 30x40.
     Next to the printer! I use inkjet prepared fabrics. This coating gives the best colors, makes it permanent and are UV protected. My Epson printer Ultrachrome inks are guaranteed for 200 years, light fast and water resistant. I feel confident in the durability of the finished work.
I choose a durable canvas for this project. I ran a couple tests to see which setting gave me what I wanted, then cut and printed the fabrics.
printed canvas and organza ready to sew
I like to allow this to dry at least over night before sewing or ironing. I feel it has a chance to set and won't smear when I iron it. These fabrics are practically water proof then.
     While I wait. I paint the fabric I will use for the border. I choose a hearty cotton duck and got the color palette out that Joni sent me. I want the colors to work with the image, playing off the contrast of blue and orange, while enhancing the room it will be displayed in. This is the fun part. I really enjoyed painting on fabric. 
     While these dry, I go back to production work for Craft Boston which will be coming up in March. here
In addition to my art which is now hanging at my solo show at the Lincoln Levy Gallery (see previous post), I did a line of silk chiffon kimono and scarves. They are in various stages of dyeing, painting, ironing, labeling. Plenty of work. 
But this allows my mind to gestate on the commission piece... more later!

Sunday, February 6, 2011

Solo Show in Portmouth NH

The show just before the opening. Up until Feb 25...
The combination of my mixed media/fiber and sculpture is terrific! Deb and I both use the circle and bird motifs, and connect with nature. This was unplanned and a serendipitous surprise!

I hope you can see the show.
It really is, Flying with Light!

Monday, January 31, 2011

Away


Underneath the snow and layers of crystalline ice,
The water is still flowing,
Making its way silently,
  darkly.
Away, away,
Always moving quickly away.

ONE more collage

ONE more Collage from my Movin' On Series for ONE- One Cause, One Wednesday, One Hundred Collages. An all-star lineup of artists have donated artwork for this fundraiser to fight cancer.
MORE here!!
ONE Day Feb 16, 2011

Thursday, January 27, 2011

Surface Design Conference Confluence 2011 is coming!

This workshop opportunity came with the 2005 Surface Design Conference. Dorothy is one of my fiber shero's and I was very lucky to be accepted into her workshop.
If you ever get a chance I recommend her mind bending workshop!
And the Surface Design Conference is coming up this June 2011!
I am lucky to be able to teach at this venue!

WORKSHOP OFFERING- MIX IT UP! AT SDA CONFLUENCE CONFERENCE JUNE 2011

click here for INFO
video can be seen on UTube- here

Tuesday, January 25, 2011

Flying with Light

You are invited
Flying with Light
a collaborative solo exhibit of artwork
with artists
Sculptor, Deborah O’Leary
and
Mixed Media/Fiber Artist, Wen Redmond
Feb 4 through Feb 25
at Lincoln Levy Gallery
136 State Street, Portsmouth, NH
Meet the Artist and
Reception Feb 4, 5-8 pm

Gallery hours: Wednesdays thru Saturdays 10 AM to 5 Pm
Sundays Noon to 4 PM
Deb's website here

Sunday, January 23, 2011

Movies!

I have posted some video's on my website, including one on how to use up left overs, paint that is...
I would love feedback. I'm kinda new to the vid-making process.

Friday, January 21, 2011

No Holds Barred

The New England Quilt Museum announces the opening of NO HOLDS BARRED, a juried exhibit of recent art quilts by the New England region members of Studio Art Quilt Associates (SAQA). Jan 20-April 9.
Yours Truly will host a Demonstration and Trunk show!
There is a schedule of events, not to be missed!
more info HERE

ONE

Another Collage from my Movin' On Series for ONE- One Cause, One Wednesday, One Hundred Collages. An all-star lineup of artists have donated artwork for this fundraiser to fight cancer.
MORE here!!
ONE Day Feb 16, 2011

Tuesday, January 18, 2011

New Website

Same Address
New Site! Exciting!
Please travel there and tell me what you think!
here
Thank you

Saturday, January 15, 2011

Blue Door Gallery

Accepted in NYC at the Blue Door Gallery!
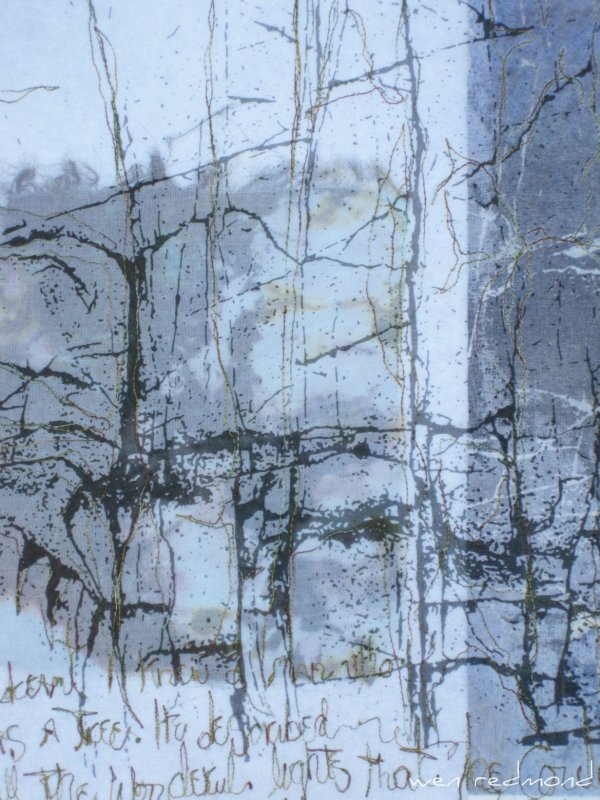
I dreamt I knew a man who was a tree. He described the wonderful lights that he could see.


Detail
Digital Fiber
Digital manipulated interpretation of a photograph.
Printed on inkjet prepared cotton satin and silk organza.
Creatively stitched.
19x27

SAQA's own Arlé Sklar-Weinstein, Director: Blue Door Gallery, was the Juror for Fiber PLUS!
more info here

Wednesday, January 12, 2011

non-speaking, speaking

Captured

laughing until I reach a zen moment, 
I remember to forget...forgetting, I remember it all again-
cycles of time, 
spoken out loud 
to my inner self.

Sunday, January 9, 2011

Elmer's Glue Crackle Technique

I just learned a really cool and inexpensive crackle technique.
Paint your cloth or base. I used acrylic paint- what ever I have open or ready at hand. Spread on your glue and immediately paint with a contrasting paint.
Let it dry and watch the magic crackle appear.
easy!
Apply Elmer's Glue to painted base

spread glue with brush or old credit card

Paint without drying glue


Finished, Dried and Cracked Surface

Saturday, January 8, 2011

Give Away is Finished

I was recently published in CPS and have one sealed, unopened copy to give away. Please email me at wenreddyatyahoodotcom and I will send it to the lucky winner. Thank you Everyone! We have a WINNER!!

Thursday, January 6, 2011

Sense of Touch

     Ever notice how sometimes you just start to work and pieces fall together as if by magic. As if just showing up in the studio is somehow like catching an ocean wave and riding with it. And OH what a ride!
Sense of Touch completed
Yesterday I had just such a day. I put down a background and played with some collage materials leftover from another recent spurt. I ended up with 4 wonderful pieces. Sense of Touch is one. This will be an entry for an upcoming exhibit.

the starting point


detail
     I started with a manipulated and digital collage printed on a molding paste substrate. The surround is a combination of paper compositions created earlier and painted cloth. I overlaid parts with silk organza and stitched into the piece as a mark-making tool. 
      I feel I was definitely in touch with the energy of creation. A sense of touch.

Saturday, January 1, 2011

New Hampshire in DE-Light!

Clouds Kissing
U
P
T
O
M
Y
E
A
R
S
in Holiday 'FUN' and the 'pleasures' of my studio.
I take myself out into the back woods- just under 50 acres with ajoining properties.
I can tramp around to my heart’s delight, creating mind reflections.
Being the age of my body and concerned about slippage, I take a stick cast off by a tree to steady me. 
Instantly, I am transformed into a Druid YoDa-like woman of the forest. 
Woman of the Woods
I am traversing looking for omens and other odd events to throw light on the thoughts harboring inside my mind. Do you see her in above picture?

Dare I Wander and Ponder?
The snow still beneath my feet,
Except for the occasional leap-
from my heart.
I tread a slow path though the woods.
stopping to stare and wonder. 
Stopping to gaze and ponder. 
These moments spinning


into golden memories.
Related Posts Plugin for WordPress, Blogger...