I've had success making my own stencils with 4ml painters plastic.
There is even heavier weight plastic you can choose to use.
They're lightweight, easy to clean & store. If you need them slightly stiffer, tape edges with heavy duty duck tape.
Nice too since they're transparent, you can place over design and trace.
If you want to repeat your stencil designs, they're thin enough to use as a mask for silkscreens.
Friday, February 15, 2013
Monday, February 11, 2013
SAQA Showcase exhibition Videos
Carolyn Ducey, curator of the International Quilt Study Center & Museum, has posted a series of videos discussing each of the artists in the SAQA Showcase exhibition. I hope you'll take some time and have a look.
Introduction - http://www.youtube. com/watch? v=c9zVhhLSdO8&li st=PL8wATen2F839 6_r4AJMdZUIDhpwQ aZdAD
Jan Myers-Newbury - http://www.youtube. com/watch? v=ClhV82ZxUg8
Gay Lasher - http://www.youtube. com/watch? v=WJa8xHRiSVE
Wen Redmond - http://www.youtube. com/watch? v=tnpIwiXKNL4&li st=PL8wATen2F839 6_r4AJMdZUIDhpwQ aZdAD
Deidre Adams - http://www.youtube. com/watch? v=D1OBvF- so0o
Michael Cummings - http://www.youtube. com/watch? v=p7ToW2SoVX0&li st=PL8wATen2F839 6_r4AJMdZUIDhpwQ aZdAD
Susan Shie - http://www.youtube. com/watch? v=Iq7msimBzmI&li st=PL8wATen2F839 6_r4AJMdZUIDhpwQ aZdAD
>
Introduction - http://www.youtube. com/watch? v=c9zVhhLSdO8&li st=PL8wATen2F839 6_r4AJMdZUIDhpwQ aZdAD
Jan Myers-Newbury - http://www.youtube. com/watch? v=ClhV82ZxUg8
Gay Lasher - http://www.youtube. com/watch? v=WJa8xHRiSVE
Wen Redmond - http://www.youtube. com/watch? v=tnpIwiXKNL4&li st=PL8wATen2F839 6_r4AJMdZUIDhpwQ aZdAD
Deidre Adams - http://www.youtube. com/watch? v=D1OBvF- so0o
Michael Cummings - http://www.youtube. com/watch? v=p7ToW2SoVX0&li st=PL8wATen2F839 6_r4AJMdZUIDhpwQ aZdAD
Susan Shie - http://www.youtube. com/watch? v=Iq7msimBzmI&li st=PL8wATen2F839 6_r4AJMdZUIDhpwQ aZdAD
>
Thursday, February 7, 2013
NHPTV Upcoming Auction
one of my serendipitous collages framed for New Hampshire Public TV
more info here
The 40th Annual Spring Auction will air April 26 – May 5, 2013.
![]() |
| my NHPTV donation |
![]() |
| detail |
Saturday, February 2, 2013
Bound, a WCA exhibit
“BOUND”
WOMEN’S CAUCUS FOR ART JURIED EXHIBITION
JANUARY 30 – FEBRUARY 23, 2013
PHOENIX GALLERY
210 Eleventh Avenue at 25th Street, New York, NY 10001
RECEPTION: FEBRUARY 16, 6:00-9 PM
Women's Caucus for Art and the Phoenix Gallery are proud to present "Bound", juried by Cora Rosevear, Associate Curator of Painting and Sculpture at the Museum of Modern Art. Ms.Rosevear chose 24 works and one performance piece to be displayed in the gallery (and an additional 118 works that will be displayed in the exhibition catalog only).
“Bound” featuring all women artists and one performance group, represents multiple expressions of commentary on the interpretation of bound. This exhibition explores the concepts of bound and borders--be they internal, external, constructed, imagined, imposed, or embraced and how boundaries define and shape our identities, relationships, ideas and politics. This exhibition furthers the mission of the Women's Caucus for Art, which is to create community through art, education, and social activism. Read more about WCA at: www.nationalwca.org
Please join us on February 16th from 6:00 to 9:00 PM to the “Bound” Artists.
Gallery Hours: Tuesday through Saturday 11:30 – 6:00 PM
I am proud to be included in the catalog!
Friday, January 25, 2013
Mounting Work
What to Do with Older Work
Sometimes a piece of mine just doesn't speak to me any more. Instead of burning them as the artists of old did, I choose to rework them.
I have gone back into a piece and painted over it, or I'll paint gesso over parts of it and add collage items, incorporating parts I like or I simply cut out the areas I like and mount or frame them.
Mounting
For this post, I will mount a section of a work onto a birch board panel. I like the panels because the wooden surface can really be pressed onto for glueing the new work. I have used individual stretcher artist bars and pre-stretched canvas before but these work best for this particular process.
find them here
To determine what areas of the older work to cut out for the newly mounted work, I use a pre-sized window. I cut these out of old cardboard from cereal boxes, insides of picture frames, etc. This is economical and saves more garbage from going into the landfill.
Here is a 9x9" cardboard square with a 6x6" opening. This works for me in 2 ways. If I wanted to wrap around a canvas or stretcher bar set up, I would use the 9x9" area to cut out. You need the extra fabric for wrapping.
If I want to mount a piece on 6x6 wooden panel, I use the inside of the window. I move the window around the piece to choose the best design areas to cut out for these for smaller works. I draw my lines using the inside as a guide to use to cut out the new piece.
You can also use a cut out a solid piece of paper, no window, to outline where you would cut out but I like the window to see exactly where the design is I like. I'm sure there are pre-made products 'out' there too.
After cutting my selection out. I prepare my panel by painting the sides and back of the it. Most of the time I use flat black gesso for this step.
Press firmly from center out to remove bubbles and wrinkles. Wipe off any excess medium off from the sides with a damp cloth. Paper towels will leave lint.
I flip onto plastic and weight it down to dry. Why plastic? Nothing sticks and the piece will peel off nicely.
Finished and ready to add a hanging wire!
Sometimes a piece of mine just doesn't speak to me any more. Instead of burning them as the artists of old did, I choose to rework them.
I have gone back into a piece and painted over it, or I'll paint gesso over parts of it and add collage items, incorporating parts I like or I simply cut out the areas I like and mount or frame them.
Mounting
For this post, I will mount a section of a work onto a birch board panel. I like the panels because the wooden surface can really be pressed onto for glueing the new work. I have used individual stretcher artist bars and pre-stretched canvas before but these work best for this particular process.
find them here
Here is a 9x9" cardboard square with a 6x6" opening. This works for me in 2 ways. If I wanted to wrap around a canvas or stretcher bar set up, I would use the 9x9" area to cut out. You need the extra fabric for wrapping.
If I want to mount a piece on 6x6 wooden panel, I use the inside of the window. I move the window around the piece to choose the best design areas to cut out for these for smaller works. I draw my lines using the inside as a guide to use to cut out the new piece.
You can also use a cut out a solid piece of paper, no window, to outline where you would cut out but I like the window to see exactly where the design is I like. I'm sure there are pre-made products 'out' there too.
After cutting my selection out. I prepare my panel by painting the sides and back of the it. Most of the time I use flat black gesso for this step.
After the panel is dry, you're ready to mount!
I use Bindex by Peblo for mounting. It sticks faster/tacter than gel medium.
I use a foam brush to spread onto panel and than flip my piece over onto it.
Press firmly from center out to remove bubbles and wrinkles. Wipe off any excess medium off from the sides with a damp cloth. Paper towels will leave lint.
I flip onto plastic and weight it down to dry. Why plastic? Nothing sticks and the piece will peel off nicely.
I like to finish the edges of the front sides with paint, usually metallic. This creates a 'frame' and seals the fabric edge. Lastly, I paint a clear glaze, slightly diluted, on the top to seal and protect the fabric. This has an added benefit of deepening the colors, which I love!
Sunday, January 20, 2013
Relevance of Older Work
Tender Revelations
Do you ever look at your older work and love it. I have saved a number of my older pieces because I can't let go of them.
I have traveled down several different paths since I started creating fiber art, back in the day.
This piece was created when I just started to paint all my own fabrics. I still love the energy and serenity in this work. The inspiration for this pieces is explained below.
Even though I made this piece in 2002, I feel it is still relevant and contemporary.
In fact, I find the current rules of some shows of not allowing work older than a certain time span, restrictive, because older work can be quite good.
Why not share works you love, even though they aren't new?
Do you ever look at your older work and love it. I have saved a number of my older pieces because I can't let go of them.
I have traveled down several different paths since I started creating fiber art, back in the day.
This piece was created when I just started to paint all my own fabrics. I still love the energy and serenity in this work. The inspiration for this pieces is explained below.
Even though I made this piece in 2002, I feel it is still relevant and contemporary.
In fact, I find the current rules of some shows of not allowing work older than a certain time span, restrictive, because older work can be quite good.
Why not share works you love, even though they aren't new?
Description- All fabrics are created by the artist. Dyed,
mono-printed, resist sprayed, sun printed, painted and stamped. Cottons, silk noil and organza.
Intuitively curve- pieced and quilted.
31'x 23
![]() |
| detail |
Tender Reflections was enthused by
reading the book, "After the Ecstasy, The Laundry" by Jack Kornfield.
I was returning from a session at the Haystack School of Crafts in Deer Isle.
Maine and listening to the book tape. I had to keep stopping to jot down notes
in my journal. Tender Revelations
was inspired from this quote; " What can we expect when we enter
the forest? To listen more deeply to the quiet. The first steps bring us
amazements of tender revelations."
Sunday, January 13, 2013
Flanneling the Design Wall
I finished the design wall today.
I attached it to the wall with Velcro Dots, mainly at top, it took only 5 dots per each 4x8 1/2" insulation board.
I ordered the extra wide flannel at Dharma Catalog to cover the wall without a seam.
I started hanging the flannel by pivoting the insulation board out slightly from the wall and T-Pinning in position on top. I left a 1" or so to pin just behind the insulation, tucking as I pinned.
After I got the top of the first board pinned, I went along the side, tucking and pinning, then slid the insulation back into position. I continued along the top of the next board, pinning and tucking and then down the other side. I had excess along that side that I ripped off without pulling on the flannel too much. I also pulled the flannel taut as I pinned and tucked the remaining side. I pushed that insulation back into position.
Just to be on the 'safe' side I hammered just 4 larger T-pins into the wall along the top of the insulation board.
I have 3 electric switches & an outlet that I had cut out of the insulation. To access this, I pierced the flannel and
trimmed it away, leaving a 1/2" to pin down around the opening. Not too bad.
It was a'job' to handle a big piece of flannel and I wasn't sure it would work but I now have a 8'x8' design wall!
Saturday, January 12, 2013
Integrating A Paradox: Art Quilts XVII
my work has been honored and included in
"Art, in its most paradoxical, often reflects the innermost, personal part of the artist's soul, which is then allowed, even encouraged, to be placed on display for all the world to see - perhaps to communicate." Wen Redmond
see the rest of the show- HERE
Integrating A Paradox: Art Quilts XVII
"Art, in its most paradoxical, often reflects the innermost, personal part of the artist's soul, which is then allowed, even encouraged, to be placed on display for all the world to see - perhaps to communicate." Wen Redmond
![]() |
| In Boats They Fled |
see the rest of the show- HERE
Wednesday, January 9, 2013
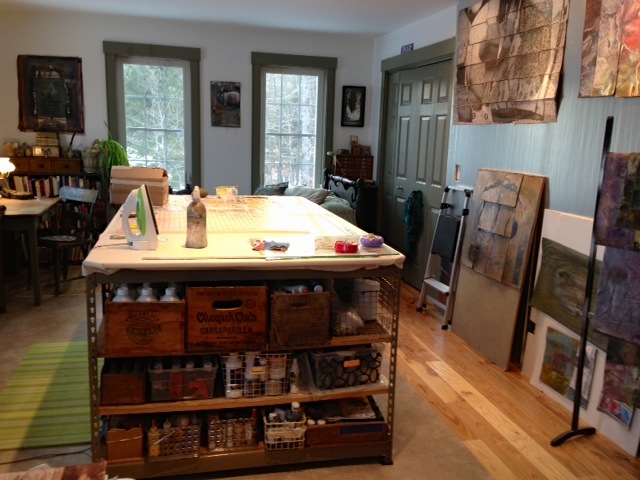
New Studio Tour
Welcome to Grey Moon Cove Studio!
There has been a discussion about studio organization going around on one of my yahoo groups, which spurred me to show you what I did in my new home studio.
It took allot of figuring out how to condense 2 other studios into a smaller space.
I think it worked well. Please enjoy and let me know what you think!
For my work table- I used 2 36" H x 18" D gorilla shelves.
These are heavy duty shelf systems sold for garage or workbenches.
They have several shelves but you can add more.
I placed them parallel to each other and depending on the size of the top you use,
you can have more storage underneath- between the shelves.
| Gorilla shelve table with vinyl flooring underneath & memory foam mat on left |
I topped mine with a 4x8 sheet of plywood. There was plenty of space underneath for a 40x30 flat file and small plastic roller drawers on the opposite side.
I topped this with thin batting and cotton duck. It's great to use as an ironing surface and has enough give for screening and print making.
When I need a harder surface, I top with my large rotary cutting mat.
When I paint, I spread a 4 ml plastic sheet over all of this and I'm good to go.
Because I work spontaneously and messy I need to protect my brand new wood floor under the work table. I bought a 8'x12 vinyl flooring piece at Home Depot. This isn't permeable as carpet would be and I can easily wipe up paints and mediums. The vinyl comes on great big rolls.
I have a memory foam 'rug' that I got at TJMax where I stand the most- comfy.
Lights- I don't like the look of fluorescent lighting or the almost undetectable pulse. I purchased LED bulbs that are set in eyeball socket and recessed cam's. The eyeball lights swivel so you can point them in any direction. LED's are more expensive but don't use as much electricity and last a long time- so I don't have to climb up to replace them as often. The lights are on dimmers so I don't always need to use them at full blast.
| overhead LED lighting |
One closet just has shelves in it instead of the traditional pole. And lots of shelves. We use the system that has metal rods you attach to the wall, insert brackets and top with a shelf. Easy.
My desk area is a U shape with a swivel chair so I have lots of surface area that is easy to reach. It's comprised of 2 6' tables I purchased from a retiring crafter. A sewing table with back extension for larger work and more desk area when not in use. and on back wall, on left below, is my new Epson 3800 printer.
note- I found the gorilla shelves at Home Depot- Here
Monday, January 7, 2013
Media Mix Postcards
Friday, January 4, 2013
Pro Chem's workshop -Serendipitous Collage
Check out Pro Chemical's workshop line up
and
mine to be offered there this April.
Serendipitous Collage embraces the unknown and unexpected. A really easy and exciting way to create collage- magical!
This serendipitous way to create collage taps into your inner muse! Use your created fabrics and papers to create paper and cloth MeDiA MIX collages. Get inspired!
“I am in transition, do not be discouraged. What I am doing is a act of courage, to give birth.” Paulous Berenshon
Workshop: We will make a several different presentations of collage, including fabric-based postcards, and small 8x10 collages on watercolor paper mounts. We will create a variety of painted and printed fabrics and papers using general acrylics and fabric paints. Techniques will include different painting techniques, image transfer, mono printing, sun printing, resists and an introduction to some medium enhancements. This workshop encourages the use of recycled materials and supplies you already have. Focus will be on spontaneous creativity and freedom of expression while creating green art.
Partially based on Wen’s article in Cloth, Paper, Scissors- Jan/Feb 2011
Thursday, January 3, 2013
New Work on UpLiFtMenTs
Digital Fiber #3
Printed original photograph with natural print
Stitched 8x10 Matted and packaged in a clear bag.
$18.00
Stop by and let me know what you think!
Monday, December 24, 2012
Happy Holidays & New Year!
Peace & Best of all that you desire this Holiday Season and 2013!
May the world see our similarities instead of our differences!
May the we wish to see peace instead of strife!
and
May we all cut each other some slack on the highways!
Wednesday, December 19, 2012
2013 Niche Award Winner
Two of my works have made the finalist for the Niche Awards. This is like the Academy Awards for the Arts.
It will take place in Philadelphia, PA at the Buyers Market of American Craft, Pennsylvania Convention Center in February 16-18.
![]() |
| Leaping Point |
| signs they sent me |
![]() |
| Whispers of the Positive |
Saturday, December 15, 2012
Holiday Sale in Maine
YORK ART ASSOCIATION
HOLIDAY SALE
Route 1A, York Harbor ME
I'll be offering some of my small encaustic's.
Tuesday, November 20, 2012
Forgotten Wings
| detail mounted on 1 1/2" black painted canvas |
Friday, November 16, 2012
Leaving Home
Monday, November 12, 2012
Short Memories- new work
| mounted on 1 1/2 canvas |
Sunday, November 4, 2012
Recent work-12x12
Early this year I printed off some images of a variety of things- journal pages, leaves, etc.
I really like working with my journals this way and plan on a series. Here are a few details of them so far.. They are all 12x12 's and some will be mounted on canvas.
Subscribe to:
Posts (Atom)


Wen+Redmond.jpg)