Thursday, April 15, 2010

Work at Dana Farber and New Bridge on the Charles, MA

It is always so much fun to see one's work displayed in it's new location. I love it when folks send me pictures too. I was fortunate to be able to see 3 works in their new homes.


South Shore Hospital –at the new Dana Farber Cancer Building
55 Fogg Rd, South Weymouth, MA 02190 -
artwork is on 2nd floor waiting room
Ripples
A moment alone. Manipulated digital image of water.
Original image printed on archival digital canvas, bordered in hand painted and surface designed fabrics. A section of the image printed on transparent silk organza, providing a holographic effect.
Additional stitching details. Set of 3 24x24


and
New Bridge on the Charles, Dedham Ma for directions.
Your artwork is located in the Health Care Center on
Level 1, North RSU, Wing 7115 and on Level 1, South West entry corridor.
Rooted in Matter and Winter Tree. (Winter Tree can be see here)


Wednesday, April 14, 2010

Quilter's Connection


I had a marvelous time with the warm and wonderful
fiber folks at Quilter's Connection Quilt Guild, Watertown MA. They hosted me for a back to back Piecing in the Flow Workshops on Saturday and Sunday, and a Presentation at their Monday night guild meeting.
Here are some shots of those events.
Thank YOU QC!

Monday, April 5, 2010

1000 Artisan Textiles

I am shocked and very pleased to find out 5 of my pieces will be in new 1000 Artisan Textiles book!
Quayside Publishing's new book 1000 Artisan Textiles by Sandra Salamony & Gina M. Brown
Inner Heart, collaged digital prints and surface-designed textiles, stitched
Angels Do Listen Collage, Hand Dyed painted, transfers and digital print. Donated to SAQA auction 2009 here
Hard Ball, Holographic Fiber- digital-printed cotton sateen, silk organza, and Belgian linen, stitchedUnhinged, Holographic Fiber- digital printed, hand dyed, paintedTrees Seen, Forest Remembered, Free Fabric Collage- digital printing, fused on canvas with hand-painted and silkscreened fabric

Tuesday, March 23, 2010

Beneath the Surface

I have been accepted to a juried invitational exhibit by the Dinner at Eight Artists. They will present Beneath the Surface, a special exhibit at the International Quilt Festival in Long Beach, CA - July 22-25th at the Long Beach Convention Center.

detail
Shaking the Tree of Imagination Statement

In the artistic process, I discover more techniques, and inspirations along the way. This leads to more discoveries, an evolution. I make the art and then the art makes me. Each work is individual and a communication between my inner imagination and later, the viewer. This communication is the dream, wish and hope for my artwork.
I am a process person. My process is fed by my love of being outdoors. I’m passionate about coming up with ideas and working out the kinks. It speaks to me. Part of that process is photography. I can see the most exquisite scenes or combinations of patterns and want to share that beauty. My art represents these moments. They are what lie beneath. I bring them back to share, to remember, to remind. These moments become my source, my well. This is when inspiration strikes, allowing thoughts percolate up from the unconscious and become my art, or poetry or prayers.
Layers peeled back reveal the source, the inspiration, and my mad desire to capture thoughts, dreams and the beauty of nature.
Process
I made Shaking the Tree of Imagination for the Beneath the Surface Invitational by the Dinner at Eight Artists. I decided I wanted to explore my current interest in Photographic manipulation. The layering techniques I use in this process seemed suited to the theme.
I layered 3 photographs together to merge as one. The photograph started out as image from a walk taken in my local area’s forest. This is often the first layer to my artwork. The idea becomes reality though the process of my art, the inspiration. That is how the title of the work came to be Shaking the Tree of Imagination.
The other two photographs in this layering process were images of my painted fabric. This provides a rich source of color that can influence and change the final result, the digital layer. The photographs were divided on the computer into sections and printed using an Epson 2400 onto pre-treated inkjet cotton broadcloth. They were assembled on batting, cut apart and physically collaged. This was another layer, the physical. I printed 3 more sections on silk organza and fused those to the piece. Each section was creatively stitched with a spontaneous design. I added metallic paint accents, drawn with a fine nozzle bottle. The final pieces were mounted on a hand painted backing of cotton duck.
The piece was drawn from the imagination, layered digitally, printed, layered physically and then collaged.

Monday, March 8, 2010

Transfer the Way You Add Images to Your Art

Image Transfer Workshop
I love incorporating photography and fiber! An image transfer is transferring an image from one source to another, giving wonderful transparent effects. This allows layering of images or let the surface show through.

We had an intense but satisfying time at the image transfer workshop at my studio yesterday. We transferred with many mediums, hitting on a variety to make samples to remember and explore techniques. We used glue or what I call acrylic transfers, tried some with freezer paper and sheets labels. We even used a very non-traditional medium that works spectacularly!

transfer with trans-web, my favorite fusible.
printed on painted cloth

Secret Method

Transfers create a lovely aged and distressed image due to the natural imperfections of the technique.

I’m offering this again at Portsmouth Fabric Co. in Portsmouth NH on April 24th.

I will be demonstrating some of these techniques at the League of New Hampshire Craftsmen’s Meredith Gallery on June 12, 11-2.

Tuesday, March 2, 2010

Ah, To be on a Blog!

Perceptions of Trees
presented at Art Quilt Elements 2010

I have been fortunate enough to have been selected to appear as a featured artist on several blogs recently.

Subversive Stitchers: Women Armed with Needles is a blog featuring a variety of folks who quilt, stitch or other wise make art using fiber. You will find quite a resource of quilters, surface design ideas, blogs and even work for sale. Why resist- check it out- here.

Ink AID featured my work along with Timothy Burns. They produce a group of products that work as a digital ground. You apply this to whatever you're inkjet printing on and it will preserve that image on your chosen surface. There is a sample set available that is perfect to try out. You really should check out the variety of things you can do with this product! here

I was featured on The Textile Blog. A diverse fiber blog covering international, ethnic, and historical as well as contemporary fiber work. The Textile Blog describes my process with exacting clarity. I was humbled and impressed by the insight the author demonstrated. An excellent article and blog. here

Thank You Everyone!

Sunday, February 28, 2010

Mono Printing- Fast, Furious and FUN!

Whole cloth; painted, monoprinted, text silk-screened, oil sticks and free drawing lines with stitching. I was in a meditative place when I created this piece. When I view it, it serves as a reminder of that special moment. It allows me to remember this when in the throes of daily life. Rayon 23hx30w Traveling with SAQA 09 Fibrations until 6/10
detail Dreams Awaken
I have been working on an upcoming workshop- I usually review and improve every time I give a workshop. It also jogs one's memory. I REALLY like this process! It's a spontaneous print technique that layers fabrics visually.
A simple tag turns into a printing plate!
painted with basic acrylic paint
mono printed on top of another print
In the workshops we will experiment with several techniques to print fabrics. This method doesn't use a print press and is suitable for every level.

One of the best things about this technique is it's spontaneity, intuitiveness and ease of developing really great pieces. Right up my ally!
It will be hard to cover the sheer variety of methods, but we'll all give it a go.

Monday, February 15, 2010

Ink Aid Rocks

InkAID Just featured my work and Timothy C. Burns
I love his quote "I found myself back into art; I still find myself in art."
InkAID is a Digital Ground. 
You prepare your substrate/surface pretty much anyway you like. ( Let me count the ways!) Make sure it is flat enough to fit in your printer. Paint with inkAID and print! Two of the fiber pieces featured are Pause and Edge of NIght. They were both made using light weight molding paste. I painted light molding paste very thinly on a substrate of rayon polyester stabilizer, followed by inkAID with touches of metallic, accenting the brush stoke ridges. I used 2 coats of ink aid in each direction. InkAID comes in clear, and metallic colors. It's fun to experiment with these to create unusual effects. Try painting them on darker material and over print a photograph!


top left

Each piece was finished differently. Edge of NIght was mounted onto artist board. I thought it would be interesting to break the image into four sections on four boards. The piece sold before I retook another photo to show the depth of color.
top right
bottom left
           bottom right
I manipulated each photograph and printed with an Epson 2400 using Ultrachrome inks.

Pause can be seen on my website. It was divided it into 9 sections of 11" x14" in Photoshop. I mounted those on another substrate to compose the final piece. UV Resistant coating was painted on top.
It certainly opens your options to experiment with this product!

Thursday, February 4, 2010

Photo Shop Play

One of the things I like to do to relax is play with my photo's in Photo Shop. Here is the original image.
I overlaid the image with a photo of painted fabric. You can see tints of the color coming though.
Then I went to image> invert.
For this image, I copied and pasted in a new file, using sections of above photos. I did change the hue in the center image. Such fun!Try playing with your images. Just do it. If you're afraid of ruining your images, just make a copy first. Then see what those buttons in photo shop DO!

Wednesday, January 27, 2010

Mixed Media Fabric Techniques Workshops Announcements

Come Try Your Hand at some Mixed Media Fabric Techniques

Wen Redmond will offer 4 very unusual fabric creation workshops from her studio in Rollinsford NH. Come Explore and widen your approach to fabric printing and collage. 
2/27 Easy Image Transfer- Explore a variety of transfer techniques. We will a variety of image transfer techniques to create unique and personal images on your quilt art! Add unique and personal touches to your projects.
3/6 Gelatin Printing- An unusual approach to printmaking. We will work on small slab of gelatin to create unique and unusual fabric prints.
3/13 Mono Printing- Layer fabrics visually with spontaneous print techniques. We will experiment with several techniques to embellish your plain or painted fabrics.


3/20 Mix It Up! Mixed Media Collage Workshop Learn about various mediums, and techniques. Use up your old hard copy photos and printed papers to create a paper and cloth mixed media collage. Some image transfer and mono printing will be introduced.
Come Explore!

Saturday, January 16, 2010

Silent Affirmations

Silent Affirmations

The unseen,
the inner foundation of my soul is
the knowledge of my interior-
some open, some closed,
but continuing to go forward.
Always retuning to remember,
to look inside
my mirror,
in the water underneath
feeding that energy,
restoring the chinks 
that reality snips away.

Thursday, December 31, 2009

Basic Fabric Printing

Steps
1
Choose your image and make adjustments.
2
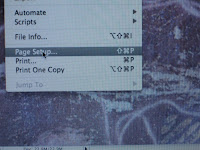
Set up page- file>page set up.
3
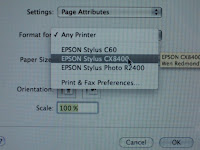
Choose your printer- you will need to do this again in printer window.
4
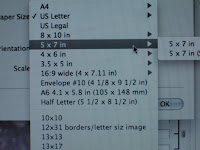
Choose page size of your finished print.
5
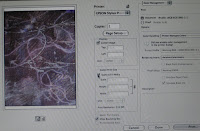
Go to file>print and printer dialogue window pops up.
6
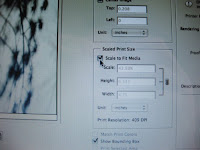
Be sure to check fit to scale box.
7
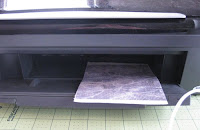
Print and you're ready to print again.

I have been printing on fabric for a number of years now. I first just used my small document printer- a Epson 60 model. I used to use bubble jet and found it was way too much work and not that effective. I now use prepared fabrics- just Google inkjet fabrics and you will find lots with different price points. I print fabric with a Epson 2400. It works very well and the Ultrabright inks on prepared fabric is just about water proof. I tested by soaking printed fabric in a glass of water. It was fine. The printer never gives me trouble except with slippery surfaces like glossy canvas. I need to help that along by lightly pushing it into the printer as it starts to feed, taping the edges or trimming the right corner feeding edge. Just cut your fabric to size and print!
Lately I have started to experiment with Ink Aid and soon Golden's Digital Grounds. The advantages to these are the ability to print on just about anything that will fit in your printer. The thickness should be listed in your printer spec's, found on the website or manual. Mine prints to the width of a flat penny. You can make a gizz-mo that is as thick and test your substrates for fit.
Everything you do will be your teacher, just try.

Silk Organza- I simply use the regular paper setting on my Epson 2400. However, I do slightly increase the Saturation or Intensify hue in Photoshop.
This slightly increases the color, which looks a little too much while in Photoshop, but when printed on the silk organza comes out just fine. Since this action is not directed at the printer, there is no ink pooling. There is some bleed though, but that is to be expected when working with sheer materials of all kinds.
I often use the paper substrates in collage. Quilting Arts offers a DVD with that goes over my Holographic Memories technique.

Saturday, December 19, 2009

Art and Meaning

This dialogue has been around the block a few times, here and in the 'art' world. 

For me, I get excited by figuring out different ways to present my techniques and photographs. Often, without my deliberate attempts my meaning comes though. When I TRY to do this, I often fail. Creation is a dialogue between what I do when I'm art making and the response to that act. I call this being in the 'flow'. Part of my artist’s statement and my teaching is about just this thing- about letting go and dancing with the materials. When this happens the art becomes the

 meaning. The sum is more than the parts. 

Capturing Moments 2009

After that, the viewer will bring their dialogue into the 'picture'. Their interpretation becomes part
of the piece. Their meaning adds to the final result. 

Art has meaning in the act of creation and in the viewing of said art.

That said, The connection with Nature and the spiritual experiences therein are very special. The confirmation given though shared experiences always reaffirms that connection and makes one want more. So out for a walk I will go, to see the rocks smiling and to feel the trees embrace.

Wednesday, December 16, 2009

Sensing Winters Peace

Sensing Winters Peace,

Follow, into a time of rest.

Renew, and bring light

into the dark spaces.

Sing loudly.

 Peace for those with Good Will!

Happy Holidays!

Friday, November 13, 2009

Playing with Photoshop


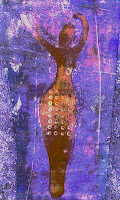
One of my favorite late night activities is playing with Photoshop. I love to messaround with my photographs, some of my work, some images of nature (my favorite subject). These are photographs of an experiment with gelatin printing. I love the texture that can be achieved with this technique. For this piece, I used a hand cut stencil of a ancient Goddess figure. In Photoshop, I used the paint bucket to add color. Just click on the tool and a selection of colors pop up. Then click on the photo and the color drops in. In Adjustments, I changed the hue using the slider. This is always fun, almost like magic. For the last image I flipped the image horizontally, so the Goddess is facing left. To do this just go to image, rotate. There are many wonderful and cool things to do with your images in photoshop. Just be sure to make a copy of your photo before you play so you don't lose it and experiment, press buttons!
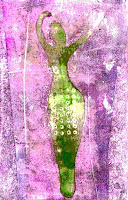
 

Wednesday, November 11, 2009

Listening to Yourself

                                                           open windows 1997
How many times I hear
the soft whispering of new-
try this, or what if..
'No, no one is doing that!'
I think.
'Thats because you should do it!'
my muse smirks.
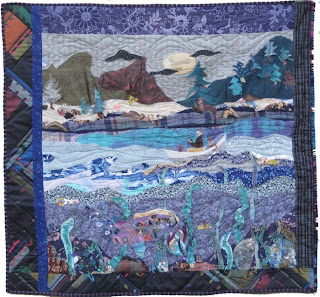
Stuffed to the Gills 1989
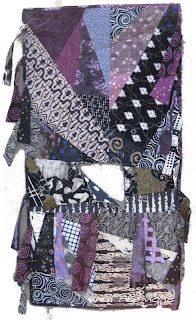
There have been many times when I started or tried a new technique, only to abandon it. Later, and sometimes years later- it became trendy! For example, back in the 80's I did several pieces that were totally free applique- free edge applique. I was told children love my work. This was not taken seriously. It's taken so many years and even now I find it hard to let go and let myself try unusual approaches- even in this era of free experimentation. So my artistic goal this year, well one, will be to do just that and see where it leads. GO FOR IT!
                                                               purple connections 1988
Related Posts Plugin for WordPress, Blogger...