Showing posts with label workshop. Show all posts

Friday, September 26, 2014

Workshop Series- Piecing in the Flow

I've been teaching Piecing in the Flow for over 25 years. It was my first workshop for guilds.
I started out using it teaching a vesting workshop but found it was too busy. It needed a workshop of it's own. This workshop extends and works very well with my Fabric Transformations Workshop. A workshop of easy and fun painting fabric and surface design!

We cover Color Scheming. 
Bend the rules with curved piecing! No templates, rulers allowed!
Gentle Curves
Explore direct cutting and piecing methods that help inspire your own intuitive process. 
Yosemire' Pull, Cut & sew!
Play with various piecing exercises and techniques to transform your scraps into beautiful fabrics that can be used for quilts or wearable art.
Build to create techniques!

Rotary cutter and sewing experience highly suggested.
Ending Piecing in a Seam
Do what you LOVE!
Coming to a Cruise This Winter- http://cruise-consultants.net/quilt/caribbean/gem/gem.htm

Wednesday, August 20, 2014

At What Cost

I received a lovely note from a women using my molding paste process I cover in Textured Photographs Workshop. 
DVD is available and link can be found on my side bar.
Her work is just eye-popping, don't you agree!

Hi Wen, I finally heard today and I got into Piecing Together a Changing Planet.  The exhibition opens Dec 15 down in Homestead FL at the Biscayne National Park and then travels the country for about 2 years to different Ntl parks.
I am so thrilled and as you can see I've enclosed the image with a detail.  

I want to thank you so much for the time and effort you spent teaching me the process.  Go right ahead and use it on your blog if you'd like.  I am honored.
Very sincerely
Nancy Billings
nancybdesigns.com
SAQA Florida Regional Rep

Wednesday, May 22, 2013

Collage Creation 3

a taste of my Media Mix Collage workshop in August at Peters Valley- info here
I decided to spray the turquoise to cover a larger area, then removed the mask over the bottom focal point.
I added some lights and darks to create more depth. I used bronze around the edges. I spread lines of cheapie tan acrylic paint and spread side to side using an old credit card. The inexpensive paint has more body and doesn't spread, just what I wanted here!
I wanted to add touches of orange, so I choose a bird stamp to repeat image on inkjet image.
 I use acrylic paint, paper towel & plastic to create a 'stamp pad'.
added 3 orange birds, some white 'script' and a gold/green circle with Golden acrylic paint- nice but...
I went even further, adding mono-printing, watercolor paper, hand painted string and stitching. 

Saturday, May 18, 2013

Collage Creation 2


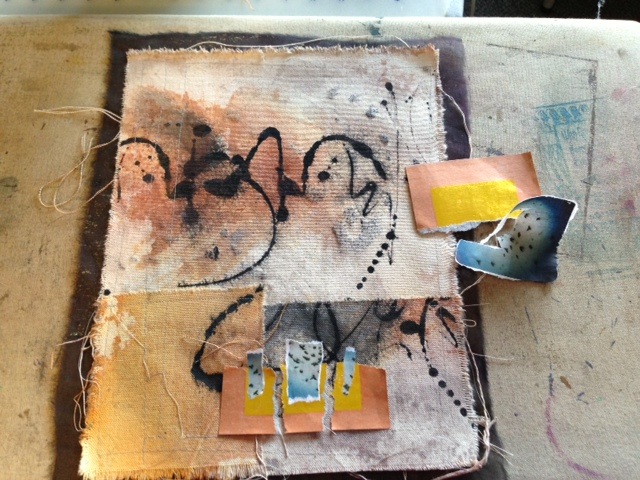
gathering my dried painted cotton duck to create a base
ripping and reassembling to jive up the marks and create a secondary texture.
added a 'backing' of black organza that had been sprayed lightly with gold Seta Color
adding paper to create a focal point- in this case, an ink jet copy of my work & joss paper

adding a 'square' of black organza
torn a free form piece of paper to add as a mask and sprayed with turquoise Dyna-Flow paint
some back to see what's next!
a taste of Media Mix Collage come in August at Peters Valley- info here

Thursday, May 9, 2013

Collage Creation 1

In my Media Mix class we create several substrates with a variety of different materials and mediums.
I will post a series of 3 posts outlining the basic steps to the Cotton Duck Substrate. This is just one example of a direction you can go in with this particular substrate.

Starting with cotton duck, I tear into strips of any size. These are about 10x22 or so. I use slightly diluted black gesso in a nozzle bottle and free motion write/mark make. This should be unplanned and spontaneous, an concept I like to emphasis.
I spray sections of the gesso to create bleeding or what I call paint movement.
 I add at least 2 more colors after the gesso. Here I've used a diluted mixture of Dyna-Flow and water.

 Sometimes I'll spray this to create more movement and blurring or leave as is for strong edges.
 If you let this dry and then add your second colors, you'll great great layering and edges. Or, as I've done here, is add my second color right away. This encourages blending and a third color creation.
I do several of these in at one time. I like to work on multiple projects at the same time. They tend to 'feed' each other ideas!
I will be teaching this at Peters Vally Crafts School, NJ in August 2013 and have taught it, among other, at the Surface Design Conference 2011.
Related Posts Plugin for WordPress, Blogger...