Friday, December 31, 2010

Collage Series Movin' ON and ONE to fight Cancer

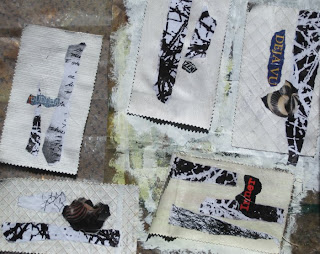
Just created a whole new way of creating collage. I am practicing my techniques for a workshop I will be offering with the Surface Design Association's Summer Conference 2011.

I will be donating 5 of these collages to ONE: One Cause, One Wednesday, One Hundred Collages. An all-star lineup of artists have donated artwork for this fundraiser to fight cancer.
MORE here!!
ONE Day Feb 16, 2011

Collage Series Movin' ON 
Collage created with hand painted and embedded fabric & papers.
Mounted on hand painted watercolor paper. stitched.
 Good cause, good art!

Tuesday, December 28, 2010

Featured on Cloth Paper Scissors E-Promo

I recently published in Quilting Arts, Dec/Jan 11 and Cloth Paper Scissors, Jan/Feb 11 magazine issues.
It is a pleasure to works with these folks. They make it easy and fun to work with. I was thrilled to see Pokey choose my article to feature on the E-mail promo for Cloth Paper Scissors Magazine today!
Read the article here!

Saturday, December 25, 2010

Sketch Book Project

I sent in my finished book.  I wanted something very organic.  I called it-  ONE.
My profile here...
Finished Cover
Inside the second from last page


Backlit Window


One earth, one people.


Each page has the word "one" on it. Can you find it?


for more info click here

Friday, December 17, 2010

Happy Holidays!

 “Seeking Quiet from the Outside In”
     Image taken on First Star Farm, Strafford NH
 Seeking Quiet,
`Into the Outside`
Treading soft winters snow.

Happy Holidays and Good New Year!

                      LOVE, PEACE AND LIGHT

Monday, December 6, 2010

Fuse it and Collage

I CAME SINGING
One of the ways I like to collage is to use a fusible 'medium'. The fusible I use is an HTC product called Trans-Web. It comes on a paper backing. 
There is a similarly named product on a sheer plastic carrier sheet- not THAT!
It irons with absolutely NO show with sheers.

(Note from 7 years later. It has not yellowed or frayed on any of the works I've used it on.)
dyed silk organza fused and left on carrier sheet
Tip- To ready a bunch of fabrics to collage at a moment's notice- use a 'spread sheet"!

I cut a section of fusible and spread it out on my large ironing table and arrange sheers and other fabric scraps from projects on it! Get them as close together as possible. Cover any sections of fusible that is not covered with fabric with plain paper, extra carrier sheets or parchment paper. This will prevent the fusible from sticking to your iron.
Fusible is difficult to remove from your iron. If you do get fusible on your iron. Iron over a dryer sheet. It usually comes off.
I store my fused scraps right on the sheet until ready to use.

Always keep the carrier paper the fusible is on. It offers great protection when ironing large quantities as I have just suggested
Additionally, I use it to compose on. You can iron your fused pieces on it and arrange as you would on a design board. Simply peel and rearrange. 
When composing on cloth, I just hit the fused cloth lightly with my iron to position. That way it can be carefully removed and recomposed.
When you're ready to complete your project, iron with steam and gusto!
more here
buy it here

Sunday, December 5, 2010

Holographic Workshop at Northern Lights

This past Saturday I taught my Holographic Images Workshop to the Northern Lights Quilt Guild in Lebanon NH.
One of the terrific pieces constructed at the Holographic Images Workshop
framing


What a terrific bunch of women! They were gracious, enthusiastic, and well, just great! ( Think of Tony the Tiger when you say the word 'great'!)
the photo shoot of the photos


The workshop went smoothly and everyone went home with a completed image.

Working with hand-painted fabrics turned out some serendipitous surprises! 

Tuesday, November 30, 2010

Free EDGES

     Something else I've been exploring is presenting work with free edges. This work encourages the ravelly and loose edges that only fiber work can achieve. So far I've used it only with my collage work but I can definitely see the possibilities with "traditional" art quilts. See August 25 and July 6th postings- here
Within Without
fiber and paper mixed media collage
      I have to say I love all of the ways fiber is literally and physically extending it's parameters! I started quilting 'back in the day' and went though the "OMG it's machine quilted" revolution. The very first work I saw that fully embraced the possibilities of fiber was Fran Skiles' work in Quilt National. I think it was '87. What an eye opener! 
     I continue to be amazed by the direction fiber is taking- painted work aka Deidre Adams and, the free applique of Fenilla Davis, Linda Colsh, Dominie Nash, the collage guru- Joan Schultz, the free spirit of Susan Lucky Shie, digital advances in fiber and the non-use of commercial fabrics started by the likes of Elizabeth Bush, & Virginia Avery. 
     I can not completely name all of the fiber artists I love and embrace. 
I am awed, thrilled and honored to share this passion with so many of YOU!

Monday, November 29, 2010

EDGES

 For some time I have been less and less enamored with binding edges on my fiber work. Back in the 80's I used to use binding with mitered corners. Later I turned the binding toward the back. I like the clean finish of that technique. I thought it was similar to the effect of paintings on canvas.
Assembling and adding medium to edges.
In the 90's,  I used the pillowcase method. I still use and like this method but still...
I have started mounting my work in sections on very stiff interfacing and tying these together. I really enjoy this method and my piece that was accepted into Quilt National was executed this way!
However, in order to do this I had to eliminate the faced edges, as the interfacing is very stiff. Each section is like a mini-canvas. I discovered by simply painting the edges with acrylic paint, it would dry and seal the edges.
Breaking the Surface 
Fiber work is one form of art that actually has to forge it's own presentation methods. This is one I particularly like.

Wednesday, November 24, 2010

Hang 'Um High

How DO you hang fiber art??
     This question has stirred the pot on a couple e-lists I'm on. It seems to be a hot button and not artist likes to be told what to do. I get that in a big way. I rebelled against the standard of sleeve hangings required by most quilt shows. Each show seems to want their sleeve set up a particular way. Most have now 'settled' on the 3" wide and 1/4-1/2 inch down and to each side. Ok, but what if you want to enter said work in a gallery show? Most gallery shows, that I have been in, require a wired hanging device.
What is a poor fiber artist to do?
     I 'solved' this using the said sleeve, adding small eye hook on the ends and then attaching the wire so it is suitable for art galleries. If the wire shows above the work, staple i/3 of the way in, right though the sleeve and into the slat. And since the work has a sleeve, I can also use the same art for fiber shows that require 'just' a sleeve. 

Now you can also mount the work in numerous ways to canvas, stretch it on artist bars, frame it- also in numerous ways. Nail it aka fiber art cloth style. Suspend it away from the wall using certain devices unknown to me, stretcher bars mounted unseen to the naked eye and eye hooks from the ceiling. Dianne Johnson has devised a system using corner mounting triangles, while Michelle Kincaid uses foam board for mounting her free edge quilts. Fiber guru, Jane Dunnewold has a entire page devoted to the topic! here And I just received my copy of Quilt Visions and one piece is composed of multiple pieces and hung individually with some sort of metal clips that were very visible.
     SO, can we actually come to some consensus on hanging fiber art? It seems the kind and style greatly depends on the effect and kind of fiber art. This art seems to resist being pigeon holed, one kind fits all.
     I guess fiber is so malleable that it can assume almost any shape! A definite to think outside the box, frame or stretcher bars. Look out art galleries!- perhaps- it's they who need to move forward! 
My two cents.

Tuesday, November 9, 2010

Open Studios!

You are invited to an Open Studios at the Salmon Fall Mills. Artists open their studios for this Holiday event. Come see what goes on and find some wonderful gifts for giving this holiday season.
It will take place Saturday and Sunday, November 20 and 21, 10-5My Studio is on the third floor, to the left, when you enter. Studio #336.
See www.millartists.com for directions.
Art from the Heart!

Fiberworks Collage Exchange

Every year  Karen Stiehl Osborn organizes a collage exchange among fiber artists. Her website-here.
We make 11 collages and send them to her. She shuffles them and sends 11 back. It’s great fun to see the collages you get in return.
This collage series is called Fiberworks.
I had a bunch of fabric samples from an upholstery book. I used these as the base of my collages. I started by applying lightweight molding paste to them. 
This will provide tooth and a white base. The white base is similar to gesso and will let the colors come though brighter. The molding paste is thicker than gesso and can leave lovely texture marks. This helps to cover some of the texture in the fabric too.
After this dried, I tore magazine clippings and some of my black and white inkjet images that I use to create thermo fax screens. This turns out to be a great way to recycle these and add to my collage stash.
I applied this using gel medium. After it dried I went in and painted with acrylic color. This was dried and I stitched black thread drawing marks. 
Mounted with mats and send off.
 I can’t wait to see the collages that come back!

Friday, October 22, 2010

The Eye of the Quilter: Inspiration exhibit

Photographs wake up
Surprising Spirit Moments
These Treasures to keep
I have had 3 photos juried into The Eye of the Quilter: Inspiration exhibit, on display at the upcoming International Quilt Market and Festival shows in Houston, Texas.         Wilma Hart, Curator

Coming Out of the Dark
This lighthouse was one of the first photos I created in Photoshop and represents my experiments in color and form. The upshot angle, set off center gives one a dizzying experience of leaping into the unknown.

Thursday, October 21, 2010

Natural Printing Making

Quilting Arts Magazine will publish an article about my new workshop/technique.
Look for the article in the Dec10/Jan 11 issue.
Can't wait!


I use just about any natural or found items for an easy method of printmaking on paper or cloth.


Recently, I did a trial run with my fiber art group- SAFA .
Kathy looks like she has some great results!


We had lots of fun. Once you start-watch out!
                   Several items printed at once and multi layered

Wednesday, October 20, 2010

QN


Had to share. I was accepted into Quilt National AND my piece has been purchased by Marvin Fletcher – former Quilt National Director, Hilary’s husband!
I am smiling widely! 

Monday, October 11, 2010

Time


Time, we hold so precious that we try to squeeze too much in and make it go by that much faster. 
Relax, let it go. 
Just enjoy this moment, this moment, this moment.
wen

Thursday, October 7, 2010

Studio 2

            I am fortunate I have two studios. One was just featured in Cloth Paper Scissors Magazine Fall issue. It's my ‘out of home’ studio located in an old mill. See other studios here AND here
I also work at my in home studio. They function differently. I use my converted master bedroom studio for office work, shipping, mounting work, quilting and computer storage and printing. The room has ¾ walls or knee walls, which presents a challenge.
I don’t have design wall as a result but use 3x4' sheets of foam installation that I have cut and foam boards of the same size. These rest in a pile against the wall and I just pull out the current work. The foam boards provide a unique transport system for traveling to my other studio during composition times. 
            A large table made from 2 large gorilla shelves, 36” high, are topped with a plywood tabletop, dominates the center of the room. I cover this with acrylic felt cotton duck and occasionally plastic. It’s a great base for most printing, surface design and ironing. When I need to have a cutting table I simply flip a large cutting mat on top!
            I store fabric and supplies underneath, very handy. On one side, I tuck my ironing board, ready to use and the other side has a large freestanding kitchen island found at a local thrift store.
               One other item I love about my studio is rocks. I collect large rocks when I go to the nearby beach. They are beautiful and I use them for weights when I need to press books or when I’m mounting work.

Tuesday, October 5, 2010

Awaken

  I found this detail recently while I was sorting my images. It's a detail of my work Full mOOn Reflections. I decided to post it. I really like adding words to my work. And here on my blog.

Wednesday, September 15, 2010

Digging into Digital Printing

October 9
Digging into Digital Printing

Using a variety of fabrics and papers, participants will be introduced to inkjet printing. We will print on fabric and other substrates using your own digital art or photograph and create unique surfaces to print on.

Come to explore possibilities!


Contact me for registration. The Workshop will be held at my studio in Rollinsford NH- check here for directions.

Shown- Molding Paste Substrate and Collage embedded in gel medium Substrate, ready for inkAid.

Thursday, September 9, 2010

Silkscreen Mask using Plastic

    Each screening mask can produce different results. You can use torn paper, wax, tape, contact paper- all sorts of things. One of my favorites is to use simple 4 ml painter’s plastic tarp. This technique creates durable silkscreen masks.

            To start, remove wrinkles for a less creased plastic, place in dryer BRIEFLY- do not walk away- for 30 seconds or so.
            
I cut the plastic slightly larger than the size of the screen when laying on it's back. Mark where your well is with permanent marker. The well is the section of screen masked by tape. You can create your designs on the same size paper then lay the plastic over this and trace. Cut out with craft knife or scissors. 
Hint- Use a magazine image to trace around.

            To print- Lay the plastic on a piece of test fabric, place screen on top and place your thicken dye or fabric paint in the well. 
Firmly squeegee at a 45 degree angle in one or 2 passes. Too much force can blur your design; too little force won’t get the paint though. 


Here’s the magic. The paint sticks the plastic to the back of your screen, no tape needed!


Use 2 colors to make a blend. I usually just keep adding paint and get some really cool blends. You can wipe off at any time too. I always wipe onto a piece of cloth instead of using a paper towel or washing all that delicious color down the drain. The wipe cloths are often very cool themselves.
Hint- As you print, if you print over any wet surfaces, plastic will stick there too. If you do this, make sure as you lift, the plastic comes up with the screen.

Text- Adding text is a snap. Trace your paper design by placing the plastic on top. Make sure you create bridges- for example-  so the center of the e doesn't fall out. And be sure to print with the letters wrong side to you.

Related Posts Plugin for WordPress, Blogger...