Each screening mask can produce different results. You can use torn paper, wax, tape, contact paper- all sorts of things. One of my favorites is to use simple 4 ml painter’s plastic tarp. This technique creates durable silkscreen masks.
 To start, remove wrinkles for a less creased plastic, place in dryer BRIEFLY- do not walk away- for 30 seconds or so.
I cut the plastic slightly larger than the size of the screen when laying on it's back. Mark where your well is with permanent marker. The well is the section of screen masked by tape. You can create your designs on the same size paper then lay the plastic over this and trace. Cut out with craft knife or scissors.
Hint- Use a magazine image to trace around.
To print- Lay the plastic on a piece of test fabric, place screen on top and place your thicken dye or fabric paint in the well.
Firmly squeegee at a 45 degree angle in one or 2 passes. Too much force can blur your design; too little force won’t get the paint though.
Here’s the magic. The paint sticks the plastic to the back of your screen, no tape needed!
Use 2 colors to make a blend. I usually just keep adding paint and get some really cool blends. You can wipe off at any time too. I always wipe onto a piece of cloth instead of using a paper towel or washing all that delicious color down the drain. The wipe cloths are often very cool themselves.
Hint- As you print, if you print over any wet surfaces, plastic will stick there too. If you do this, make sure as you lift, the plastic comes up with the screen.
Text- Adding text is a snap. Trace your paper design by placing the plastic on top. Make sure you create bridges- for example- so the center of the e doesn't fall out. And be sure to print with the letters wrong side to you.


 To start, remove wrinkles for a less creased plastic, place in dryer BRIEFLY- do not walk away- for 30 seconds or so.


 OK, I'm washing out my thermal fax silkscreen after using it-
 cloth.

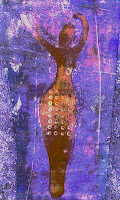 around with my photographs, some of my work, some images of nature (my favorite subject). These are photographs of an experiment with gelatin printing. I love the texture that can be achieved with this technique. For this piece, I used a hand cut stencil of a ancient Goddess figure. In Photoshop, I used the paint bucket to add color. Just click on the tool and a selection of colors pop up. Then click on the photo and the color drops in. In Adjustments, I changed the hue using the slider. This is always fun, almost like magic. For the last image I flipped the image horizontally, so the Goddess is facing left. To do this just go to image, rotate. There are many wonderful and cool things to do with your images in photoshop. Just be sure to make a copy of your photo before you play so you don't lose it and experiment, press buttons!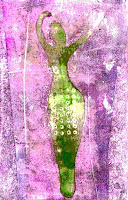


 On a roll for collages, more to come. Here's 6 for now. All matted. Way too much fun!


 One of my most favorite fabrics is silk organza. I dye, rinse and hang to dry. This helps to retain the crispness of the organza. Drying in the dryer creates lots of loose threads and softens the texture. I'm using up the last bit of my LIQUID fiber reactive dyes by Createx.


