
Welcome to Grey Moon Cove Studio!
There has been a discussion about studio organization going around on one of my yahoo groups, which spurred me to show you what I did in my new home studio.
It took allot of figuring out how to condense 2 other studios into a smaller space.
I think it worked well. Please enjoy and let me know what you think!
For my work table- I used 2 36" H x 18" D gorilla shelves.
These are heavy duty shelf systems sold for garage or workbenches.
They have several shelves but you can add more.
I placed them parallel to each other and depending on the size of the top you use,
you can have more storage underneath- between the shelves.
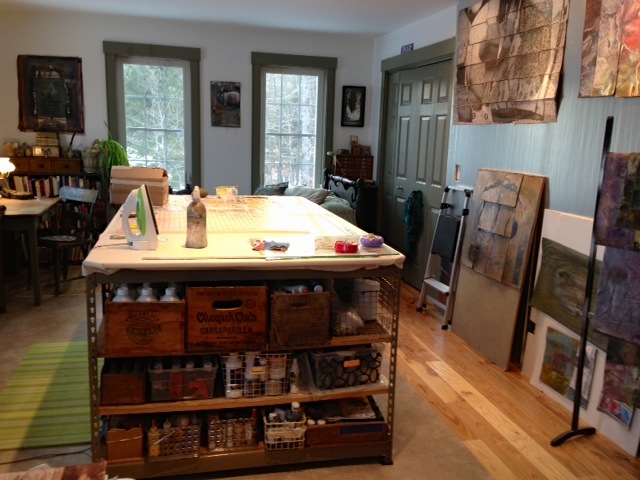 |
| Gorilla shelve table with vinyl flooring underneath & memory foam mat on left |
I topped mine with a 4x8 sheet of plywood. There was plenty of space underneath for a 40x30 flat file and small plastic roller drawers on the opposite side.
I topped this with thin batting and cotton duck. It's great to use as an ironing surface and has enough give for screening and print making.
When I need a harder surface, I top with my large rotary cutting mat.
When I paint, I spread a 4 ml plastic sheet over all of this and I'm good to go.
Because I work spontaneously and messy I need to protect my brand new wood floor under the work table. I bought a 8'x12 vinyl flooring piece at Home Depot. This isn't permeable as carpet would be and I can easily wipe up paints and mediums. The vinyl comes on great big rolls.
I have a memory foam 'rug' that I got at TJMax where I stand the most- comfy.
Lights- I don't like the look of fluorescent lighting or the almost undetectable pulse. I purchased LED bulbs that are set in eyeball socket and recessed cam's. The eyeball lights swivel so you can point them in any direction. LED's are more expensive but don't use as much electricity and last a long time- so I don't have to climb up to replace them as often. The lights are on dimmers so I don't always need to use them at full blast.
 |
| overhead LED lighting |
 |
| Design Wall, not yet covered, with overhead eyeball lights. The design wall is 1/2" insulation board purchased at Home Depot. I cut out the light switches and will cover with flannel. Great photography wall too. I like to use 32x40 large foam core boards that I can move around easily and stack too. The folding step ladder, in far left, is very light and handy. |

One closet just has shelves in it instead of the traditional pole. And lots of shelves. We use the system that has metal rods you attach to the wall, insert brackets and top with a shelf. Easy.

My desk area is a U shape with a swivel chair so I have lots of surface area that is easy to reach. It's comprised of 2 6' tables I purchased from a retiring crafter. A sewing table with back extension for larger work and more desk area when not in use. and on back wall, on left below, is my new Epson 3800 printer.

note- I found the gorilla shelves at Home Depot- Here
18 comments:
Wen, your space looks amazing! I love it.
Thanks for some good ideas. :)
Hi Wen, I've been spending these first days of the New Year reconfiguring my studio too. Sure gets the juices flowing. Now to deal with all my paperwork and ill be off and running!
Barb
thank you for sharing.. Love your studio, and great for the art you create... I love my studio also, but it has run a little away from my intentions.. need for back to basics.
Are your 36" Gorilla shelves actually a 72" unit, separated?
Are your 36" Gorilla shelves actually a 72" shelf, separated?
Looks so functional ... and beautiful. Thanks for sharing.
Looks so functional and beautiful. Thanks for sharing.
I'm green with envy. Such a wonderful, and organised, space. How can you bear to leave that room and do anything else?
Thank you, thank you, thank you for taking the time to take photos and write the details. I'll talk to my builder about the overhead lights...that seems like an excellent idea. What fun to plan (and finally get) a studio. I'm so excited I can't stand it!
Studio and house look great, Wen! If I was still on Range Rd I'd run down the hill for tea!
snappy looking set-up, Wen. mine's frankly an embarrasment at present...knee deep in goodness knows what from countless travels. due for a shovel out, i think.
Very nice!
looks to be a joyous room...
You are a great organizer! Thanks for all the tips. I need to get my studio in shape so I can photograph it. The stackable design boards are a great idea. I'm always running out of space because I have several ideas going.
Very nice studio. Do you have a sink area handy?
My sink is in the near by bathroom. Remenber that I am condensing 2 very large studios into a core space. So I think my wet work, dyeing and fabric painting, will happen in the summer. Outside, with a hose.
Also- I had a question about source of gorilla shelves- added link in at bottom of post.
And another question about how I attach the large insulation board to the wall. Since it is the lightest insulation board at 1/2" deep and 4x8', I can get away with using large velcro dots.
Wen,
Your link only shows shelves that are 72" high. Did you take apart one 72" unit to make the lower shelves on which you support the board? And, if so, did you have to buy more parts?
Diane
Post a Comment